
You are using an outdated browser. Please upgrade your browser to improve your experience and security.
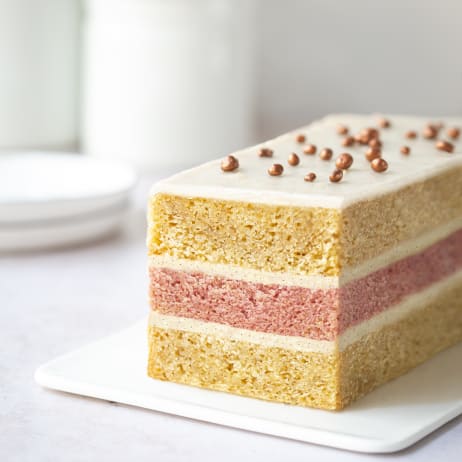
Travel cakes
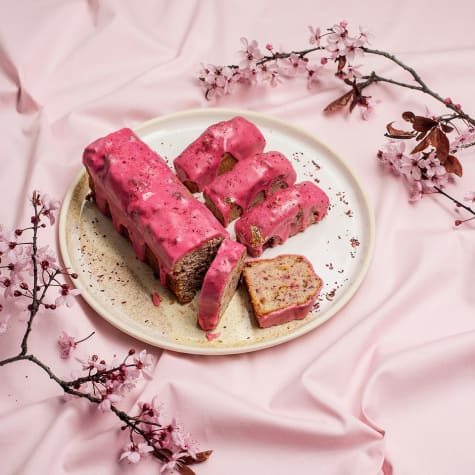
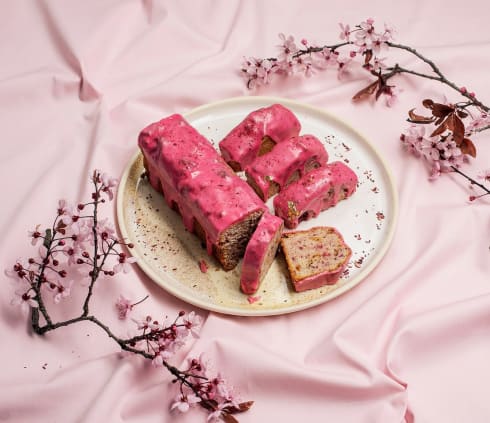
RASPBERRY & HIBISCUS GLAZED TRAVEL CAKE
Made with Dulcey 35%
An original recipe by Kimberley Vy.
Yield:
2 x 8”x4” Loaves
4-6 x Mini Loaves
36 x Financier Molds (40g)
Recipe Step by Step
Step01
HIBISCUS BUTTER
256g Butter, Unsalted
18g Dried Hibiscus Flower
s.q. Butter, Melted
Add butter into pot and melt until liquid. Add hibiscus and heat on medium low for 5 minutes, stirring constantly. The butter will bubble and milk solids will brown. The tea leaves will soften during this process and infuse hibiscus flavour into the butter.
Remove from heat and strain out leaves, set aside (do not discard). Weigh final amount of butter and ensure it is 256g, if it is less, add additional melted butter until original butter weight is achieved. Once at weight, add tea leaves back into butter.
Use butter as directed.
Step02
TRAVEL CAKE BATTER
160g Egg Yolks
5g Lemon Zest
144g Sugar #1
160g Egg Whites
4g Cream of Tartar
176g Sugar #2
13g Baking Powder
306g All Purpose Flour
10g Loose Leaf Hibiscus Tea (Optional)
All Hibiscus Butter
150g Frozen IQF or Fresh Raspberries
In a stand mixer, whisk together egg yolks, lemon zest and first amount of sugar, until light and creamy (ribbon stage).
In a separate bowl, whisk together egg whites and cream of tartar. When egg whites begin to foam, slowly add 2nd amount of sugar and whip to soft peak.
Gently fold this meringue into the yolk mixture.
Sift together baking powder, and all-purpose flour, add loose leaf hibiscus tea (if using) and gently fold through the egg mixture.
Melt butter and add a small amount of the egg/flour mix back into the butter. Mix until combined (this will prevent butter from seizing). Now add butter mixture into remaining batter and gently fold until combined.
Next fold in the raspberries and chopped chocolate until just combined and portion into:
* 8”x4” Loaf Pan : 800g – 40-50 Min
* 8”x4” Loaf Pan : 600g – 30-45 Min
* 11.5” x 2” Mini Voyage Pan : 400g – 24 Min
* 1”x3” Financier : 40g – 18 Min
Bake at 170°C / 338°F for time listed above. When fully baked a toothpick inserted should come out clean or the cake will spring back when pressed down.
Step03
HIBISCUS TEA GLAZE
188g Icing Sugar
6g Loose Leaf Hibiscus Tea
256g Water
Boil water, and pour over hibiscus tea to brew. The colour and flavor will be very concentrated. Once the tea has cooled down, pour through a mesh strainer and set aside.
Sift powdered sugar into a mixing bowl. Slowly whisk in the brewed and cooled hibiscus tea 1 tbsp at a time. Continue to whisk until glaze is smooth. The glaze should run off the whisk in a thick flowing ribbon, if the glaze is too thin, add more icing sugar. If the glaze is too thick, add more tea. Desired viscosity will depend on taste and aesthetic preferences.
Assembly and finishing
Place loaves on glazing rack and pour glaze over top starting from one end and making your way down the center to the other.
Tap again to ensure even coating
Sprinkle chopped dried hibiscus flower (10g) over top the glaze. Alternatively, you can place a segment or two along the corner, or down the center in a pattern.
To make more glam, add gold or silver leaf .
Let the glaze set for 30 minutes to harden and form a soft eggshell like coating.
Note: For a vibrant pink icing, you can also find all kinds of hibiscus teas on amazon, bulk barn or specialty tea shops.
If you are not able to get your hands on dried hibiscus flowers, dried sour cherries, raspberries, strawberries or cranberries will work fine.